Testing Adobe's Photoshop AI

Written by Brittany G.
With AI becoming ever present in our everyday lives, it is no surprise that we are seeing AI advancements within the creative fields. Adobe recently released their Beta AI that have included AI Generation, that at first glance seem quite intimidating. We decided to take a further look into what exactly this AI can do, and how it can help us.
What is the Generate Fill Feature?
Integrated with Adobe's Firefly AI capabilities, Generative Fill provides users with a new approach to work by enabling them to quickly add, expand or remove from images. Simply using the lasso tool or another selection tool users can select an area of interest and then have the area filled with AI generated digital material based on the text prompt provided by the user.
A Different Perspective
Instead of stressing about AI taking over our jobs, let's take a look into the capabilities and enhancements these tools can bring to our everyday, and how we can utilize the AI features to benefit our workflow and creative content. Here are some immediate considerations to think about when trying the new AI feature.
It's Powered by Firefly
Firefly is the new family within the creative line of Adobe Products, that is a generative AI focusing (currently) on image and text effective generation. It offers new ways to create while significantly improving creative workflows. Firefly is trained on Adobe Stock’s professional-grade, licensed, high-resolution photos, ensuring that it will not create material based on intellectual property of another (IP).
It Does Non-Destructive Editing
Generative Fill adds in layers which allows you to create and adjust your material without affecting the original, allowing you to experiment with different looks and styles endlessly.
It Allows you to be Unique and Creative
Try out new ideas on the fly, or experiment with edits and creations like never before. Easily crank out as many unique pieces of high-quality writing as you can write to make it most effective in the generation. Right now you’ll see many things being removed, added, or extended with this AI feature within Photoshop, however it is also popping up in Premiere Pro, and Lightroom as well.
Now that we have a bit of introduction into what this new AI is all about - lets get into some tests.
Example of Generative AI on Landscape Photography
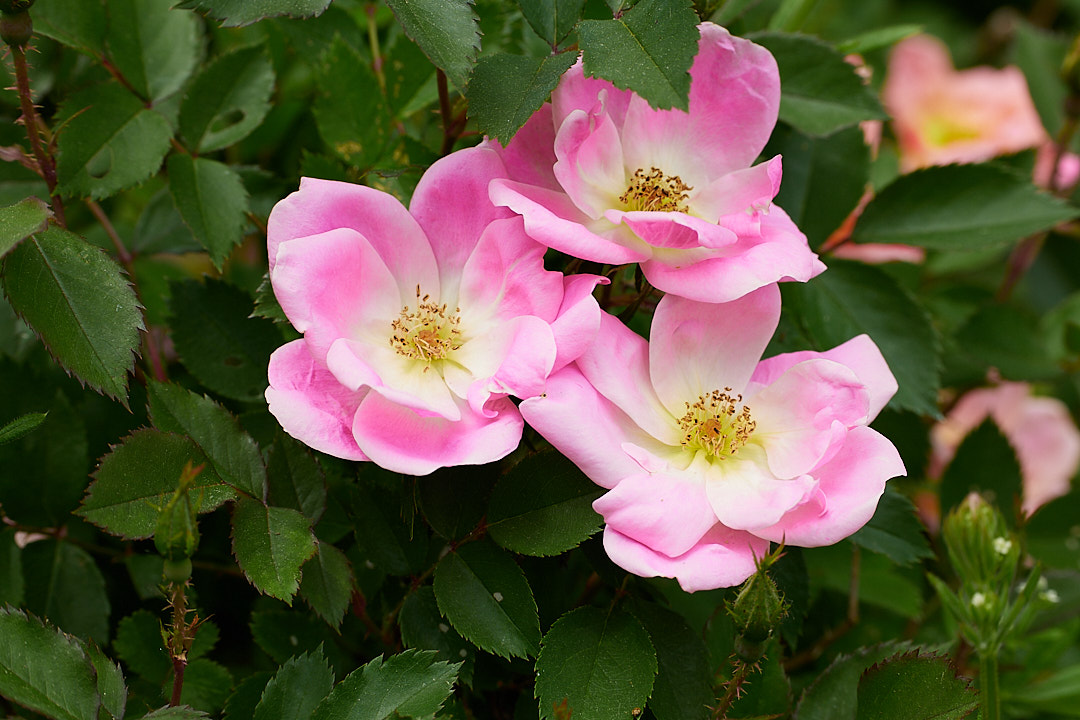
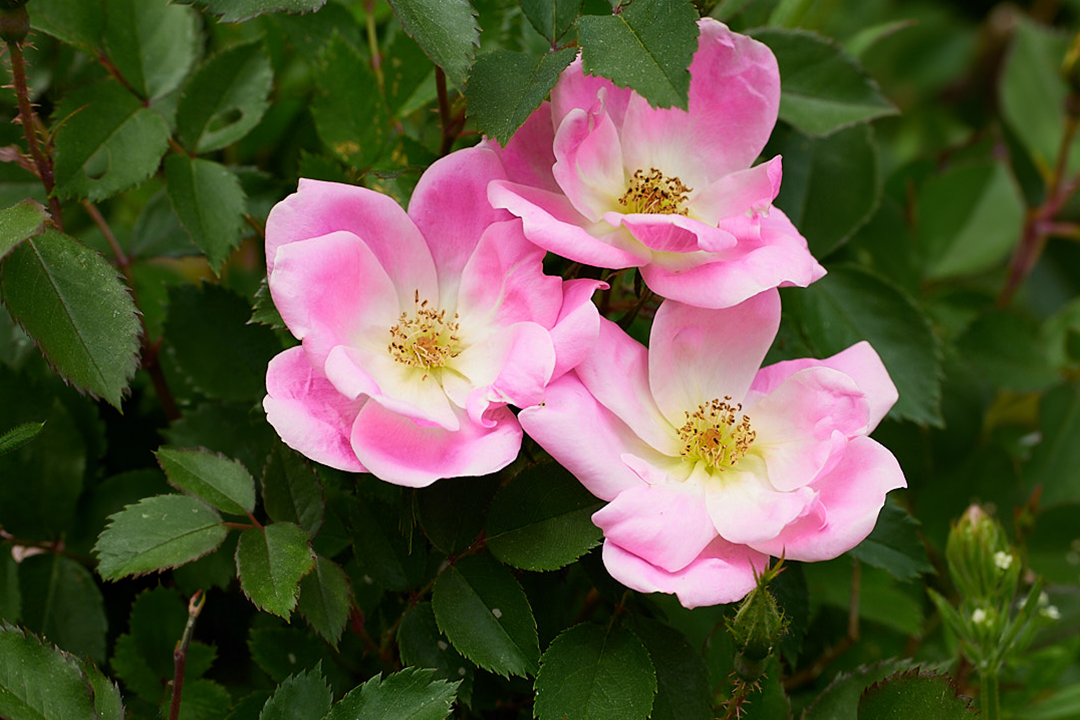
Let's dive into a simple editing example of how AI can manipulate a photo taken, and edit it without time consuming edits or as much hassle. Our goal in this first test is to create a different composition of the image by either adding or removing features in frame to provide a definitive focal point. This is the image we will be starting with:
First lets add to the image, lets see if we can balance the photo by adding another flower bud in the front left of the photo where a bit of negative space is. This will hopefully create a more distinct balance in the composition of the photo with the other flowers still in the background. Once we asked the AI for this adjustment this is what we had gotten.
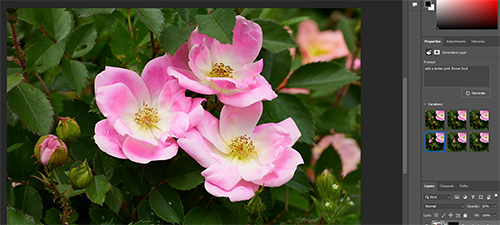
Now the options it gave us weren't too bad, they were close enough where if you didn't know what flower this was in the image you may not be able to tell it wasn't there originally. So, while we had believed the image would be more balanced out with this addition, it almost appears too crowded now for what we wanted originally.
Looking at the flowers out of focus on the right hand side, they seem to not fit in as much anymore to this composition, so why not try to remove them altogether? After creating a selection around the whole section of out of focus flowers - we asked the AI to remove and replace them with leaves similar to the ones already in the image.
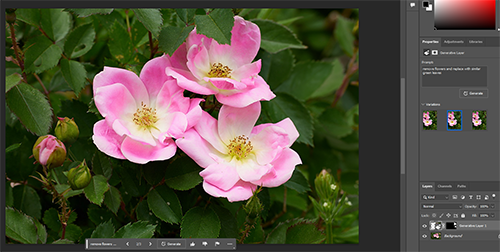
Wow! If you didn't know those flowers were in the background, you almost wouldn't be able to tell they were even there to begin with! This result in itself is pretty impressive of the AI skills, but we wanted to see if we could push this first test a bit more.
We flattened the image down that we had, selected the flower bud and now asked the AI to try to revert it to the original photo. Not surprisingly, it was not able to revert to the original image itself, presumably since the information was already flattened in the image. However it did impressively well by matching the stem and leaves it was able to produce.
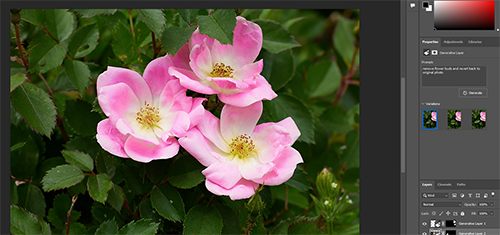
With this being the final image we settled on, the results are quite impressive. Given, we don't know which specific type of leaves it decided to add or use, imagine trying to get this result using the clone stamp tool? Or trying to source the leaves in different images yourself? That could easily take you 30+ minutes to get this result from the original image, if at that. Meanwhile, using the AI tools this edit took approximately 5-10 total to generate. Now that's Impressive!
Here are the exact text prompts we've given to the AI in each step:
- "Add similar small pink flower buds"
- "Remove flowers and replace with similar leaves"
- "Remove flower bud and revert to original photo"
For reference there were no errors in this AI generation as it was simple enough for it to figure out without misgenerating material.
Example of Generative AI on Product Photography
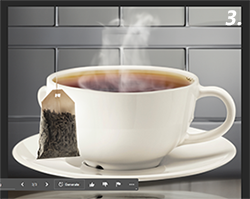
In this next example let's start with a simple rendered teacup and try to create a product photography shoot to utilize for marketing, or a sales ad. Our goal here is to fully create the scene using the AI feature, and really push it to see what we can create and what it generates in each prompt. Here is the teacup 3D vector we started with:

Starting with this teacup, we began first trying to add a backdrop to the product, to give it some type of dimension.
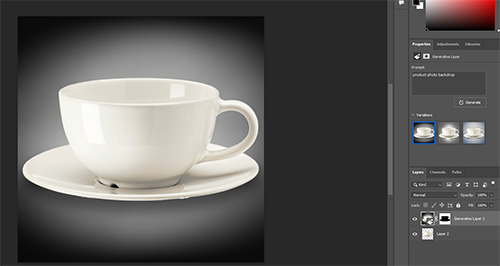
We initially got a simple gradient to start, so to specify to the AI the type of background we were looking for, we asked it to add a product photography backdrop. The results we got from this slight adjustment in the prompt definitely resulted in something that was closer to the end image we would want.
Next we wanted to spruce the image up a lil, and an empty cup doesn't seem quite appropriate to advertise - so let's fill it up! We asked the AI to add tea and hot steam to the cup at first....
The prompt was apparently too specific, or perhaps the AI misunderstood what we meant, so we retyped the prompt to just "add tea and steam" so we could re-generate the material. It gave us three awesome results, each having a different steam effect and direction, as well as the tea color being slightly different this time around.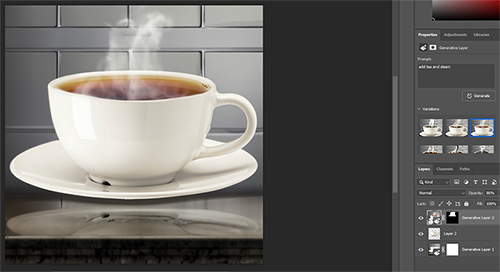
With this result, we adjusted the layer to 80% opacity to resemble a more transparent, or light tea color. So far, so good!
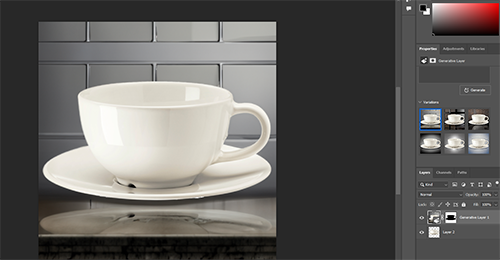
Now that our cup was full, our countertop seems to clash with the coloring a lil bit, so we asked the AI to simply adjust the countrop color and replace it with something else.

Out of the 3 results, 2 of them still kept the teacup reflection intact so we opted with the marble countertop dupe. That way it was even closer to representing something that could be recreated in a studio using V-Flat boards or a natural kitchen countertop.
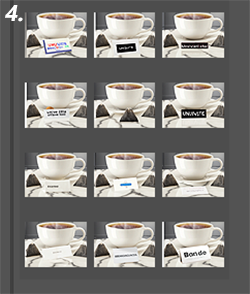
Now that are scene was coming together, the next step was to add some tea bags, as a secondary product. This addition now allows our "end goal" image to represent a "Tea Company" advertisment as it would display the tea and the tea cup itself. "Add tea bags and tea leaves" was typed into the prompt textbox and for the most part the result was consistent in showing different types of tea bags (i.e. triangular, flat, and square bags).
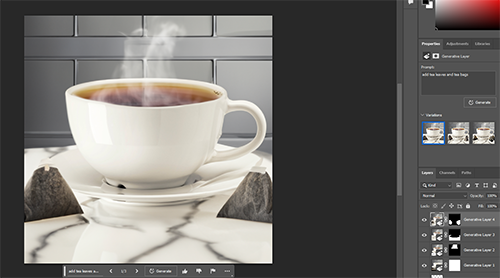
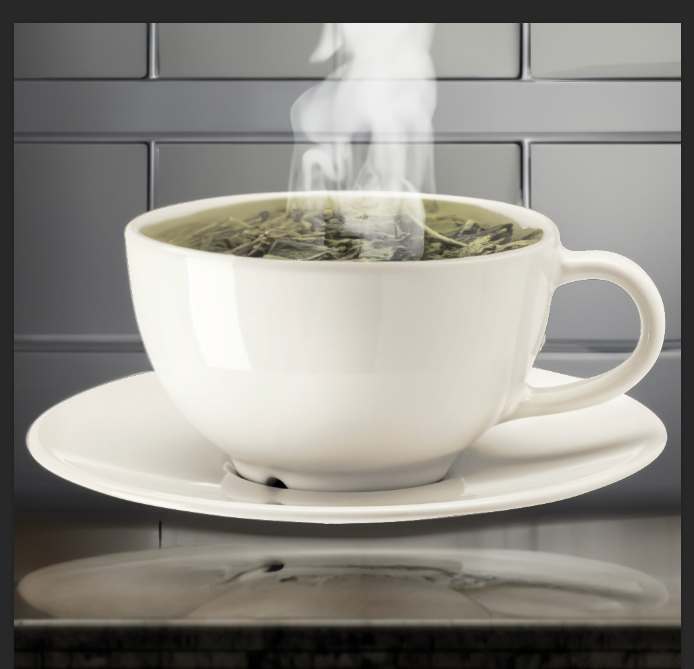
We opted for the nicer triangular bags, as they complimented the marbling in the countertop the best, and they also gave a nice balance to the image. The image we currently have not only has a great contrast, but easily represents something that could be replicated in a photo shoot - which was the type of result we were looking for. However, we did miss one little detail, like a cherry on a sundae, whats a cup of tea without a spoon to accompany it? So our final prompt in this test was to add a tea spoon to our cup.
This did pose the AI a bit of a challenge as if the selection was slightly off, either the spoon looked like it was piercing the cup, or the reflection it was trying to generate didn't quite look "right".
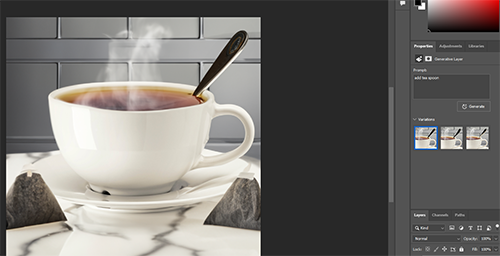
However the one result it did generate worked out perfect as the reflection itself looks like it is actually inside the cup with the light refracting somewhat realistically, and the spoon itself looks to be resting on the teacup.
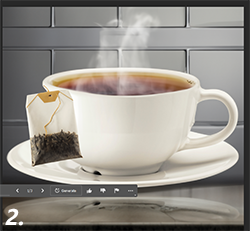
This was our final result and compared to the image we began with, the AI did exceptionally! This was a result simple enough that it could be used to promote the item if some text was thrown over it, and printed for flyers. Alternatively it could work as a product promotion image on social media.

Here are the exact text prompts we've given to the AI in each step:
- "Add a product photography backdrop"
- "Add tea and steam"
- "Replace countertop with a different color"
- "Add tea bags and tea leaves"
- "Add teaspoon"
Overall we were able to recreate a product photography set, just utilizing the vector of a teacup and the Beta AI that Adobe has. Though it isn't quite perfect, there are many things overtime it will learn and improve on. So even just starting with little to nothing, or maybe even a basic photo of a product, you can create a scene to help your own advertising or promotional material with a little creativity. It took us about 20 minutes to fully create and build out the teacup product image even including the errors we had gotten.
For reference here are some of the errors that occurred during the test:

- As you already read about was our original attempt to add tea and steam to the cup, which was the inital result was either this, or a cup of what resembled a lava like substance with regular steam on top
- This was 1 of 2 results to add a tea bag over the side of the cup, which the AI couldn't get the angle quite right
- This was 1 of 2 results to add a tea bag over the side of the cup, which the AI couldn't get the angle quite right
- This image shows the desperate attempt to get the AI to create a teabox or a sign, or box, in front of the teacup which could have been used as a space for a logo or text promo. Unfortunately the AI has it's own "language" and cannot spell real words (quite yet) though it will be curious if and when it will be able to do so.
Conclusion
While the first reactions of the Generative Fill AI are generally positive, there have been some growing concerns about AI being introduced to the creative field and eliminating the need for creators themselves. Depending on how the AI is utilized it has some good benefits for those that want to change their workflow and get a lil creative. So give it a try, see what you can create or come up with! Don't think about how it may "replace" creators but instead, how it can all help our workflows and consumption of time when in post-production!
Let's start a conversation about it, comment below and let us know what you think!