
Part Three: Shooting in Our National Parks
By Jennifer Gidman | Images by Sandra Nykerk

“It’s hard to choose, but my favorite park has to be Yellowstone—it’s never the same place twice,” she says. “I love the surreal nature of Death Valley. The Smokies are incredible for scenics and landscapes, especially in the spring and fall. And the Everglades is one of my very favorite places for birds.” Read on for Sandra’s tips for taking memorable photographs that avoid clichéd shots and allow you to capture your own unique experience in the parks. Prep before you head out into the deserts and canyons. The more research you do before your trip, the better—whether it’s talking to people who have been to the park you’re heading to before, reading every book and magazine you can get your hands on, and using the Internet. The best online sources are the individual park Web sites—they’re a wealth of information. Yellowstone, for instance, puts out a spiral-bound resource book for the naturalists that work in its visitors’ center. Now the same book is also on the park’s Web site for anyone to access: It offers information like where to see the best wildlife, where the best thermals are, etc. Other major national parks are doing similar things. Flickr is another great online resource. You can type in whatever place you’re going to, and thousands of images will turn up. These will help you get a sense of what the landscape is like, what you’ll see, and what places should be high on your priority list to shoot. Research the kinds of images that appeal to you and that you gravitate toward, and then look to see what equipment was used to make those images and where they were taken. From there, if the information is available, try to figure out if the photographer was facing east or west, if it was a morning or afternoon shot—then plan accordingly for your own shots.
 Pack smart. My philosophy is if I’m driving and I own it, it’s in the car—at least I’ll have access to it. If I’m flying, that’s a whole different story. But I wouldn’t go anywhere without a wide-angle lens, a medium telephoto, and a macro lens. I use the Tamron 10-24mm wide angle, the 18-270mm VC lens (that’s been my just put-it-on-and-shoot lens), and the 60mm macro lens (which is great to travel with since it’s so short and light). I also base what lenses I bring on the particular park I’m going to visit: For example, if I know I’m going to Yellowstone and want to shoot some grizzly bears, I’ll pack the longest lens I own (maybe a 500mm). If at all possible, take an extra camera body: Don’t go on a once-in-a-lifetime trip with one camera body. Time and again, I’ve seen those single camera bodies that have never had any trouble at all suddenly die during these once-in-a-lifetime trips. Sure, it’s easier than ever to get your hands on backup equipment these days, but you don’t want to have to wait for a new camera to arrive when you’re only spending a few days at one park. Definitely bring a cleaning kit. Yellowstone, for example, is dirty—if it’s windy, you’ll have silica dust blowing all over the place. You want to be able to clean your camera on a regular basis. There are also these plastic camera covers you can get for like $7 that are designed to protect cameras from the rain, but I use them to fend off the dust and dirt. Don’t leave home without your camera manual. Today’s cameras can be so complex, even with features you understand. When you actually get out in the park, there’s going to be something you’ll need to look up, especially if it’s not a feature you use day in and day out. I’ve always been the tripod queen—no one in my workshops is ever allowed to go out without one! For the highest possible quality and to be able to make the image as large as possible, I’ll bring a tripod with a cable release, especially for quality macro work. That said, there are some instances when you just can’t use a tripod—I’ve been in fields of cacti where there would be no possible place to put a tripod down. However, with the Tamron VC lenses and the quality of the ISOs on these newer cameras, I can handhold for images I never would have been able to do just a few years ago. Respect the landscape and other visitors. In Yellowstone, you’re not allowed to stop just anywhere on the side of the road, and you can’t just get off the boardwalk in the thermal areas. As a nature photographer, you have to understand the landscape and the habitat. It’s your responsibility to respect that landscape and make a commitment that nothing you do is going to damage that habitat. So, if you’re in a sensitive thermal area, for example, you might not be able to just wander off. Obey the posted rules and regulations and respect your fellow visitors. One big pet peeve is people who see something they want to photograph and abandon their car in the middle of the road with all four doors open—you’ll see like 80 of these a day during crowded times. It gets especially challenging when you have a lot of tourists who don’t speak or read English well, because they’re not able to read the posted rules, and they’re excited and distracted to begin with being in such a marvelous setting.
 Avoid the crowds. Don’t go to the parks in July or August. Go in the shoulder seasons if you can: May or early June, and September through October. Going in the winter is also a great idea, especially because even the shoulder seasons are starting to fill up. You’ll find fewer people and very different weather conditions during the colder months. Yellowstone and Yosemite are both awesome in the winter, as are Arches and Bryce Canyon. And you’ll practically have Death Valley all to yourself! If you do go in a more heavily trafficked season, go out early in the morning and stay out late. By the time the majority of the tourists get up and get the kids fed, it’s 10:30 or 11 in the morning. Likewise, most of them will head back to the hotel and have dinner and put the kids to bed in the late afternoon/early evening. So if you’re out at sunset, the clouds will start to dissipate and you’ll get some amazing shots. Midday is not good for photography usually—both in terms of the crowds and the lighting.
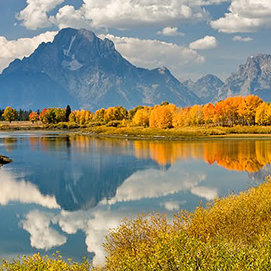
Understand and break free of the clichés. In our national parks, the views are often prescribed for us: There are specific pullouts that constrain where you can stop, how you can stop, and what you can see. These are the places that have become our iconic imagery. The Snake River Overlook in the Grand Tetons used to be just a minor pullout before Ansel Adams took his picture there. Now if you go there, there’s an interpretive sign with Ansel’s image on it: You’re no longer testing the image against the reality; you’re testing reality against the icon. You’re going to be disappointed you didn’t see the “real thing” you recognize from Ansel’s image, and if you try to duplicate his image, you don’t take away your own experience. Take in these socially prescribed views, then go out and find your own. This comes from understanding the landscape and its intimacy, internalizing that intimacy, then externalizing it in the form of an image. If you don’t feel, you can’t communicate emotion. Without emotion, a photograph is simply a record. Get off the beaten path. One way to find your own view is to get off of the roads where you’re allowed to. In the Smoky Mountains, an astounding percentage of people never get out of the car. In Yellowstone, another significant percentage of people never get more than 200 yards from the road. Just by getting on a trail and walking, even if it’s just a half mile, will give you images most other people aren’t going to get. Experiment with your lenses. The 10-24mm, for example, is going to give you a wider view than most other people shooting at the park are going to be able to get, because they’re not using that kind of a wide lens. Shoot very low with a wide-angle lens to place a lot of foreground in the image; shoot at a high aperture like f/22 to get a lot of depth of field in that foreground. The alternative to that is to use your longest lens to shoot landscape details you can’t get to physically—that will work great at picking up details in the landscape. Most people won’t use their long lenses for that—they think they’re just going to photograph animals with those types of lenses. Change your perspective. The world was not created at your eye height: Get down off of the tripod if you’re using one, bend down, find something to climb up on, so that you’re shooting from a different angle than 90 percent of the population. Go for the details as well as the panoramic shots. The truth is always in the details. While those wide, sweeping vistas are overwhelming and take your breath away, they often don’t communicate the true emotion of the place. An abstract of a thermal pool or a piece of grass in the autumn—those are the things that communicate the intimacy and passion of a park. Add people into your shots. People can be part of the landscape and part of the story you’re telling, whether it’s your own family or other people who are visiting the park. Even if it’s just a shot showing how crowded the park is, that’s still a visual reminder of your experience there. Incorporating people into your shots can also add context and a sense of scale.
Avoid the crowds. Don’t go to the parks in July or August. Go in the shoulder seasons if you can: May or early June, and September through October. Going in the winter is also a great idea, especially because even the shoulder seasons are starting to fill up. You’ll find fewer people and very different weather conditions during the colder months. Yellowstone and Yosemite are both awesome in the winter, as are Arches and Bryce Canyon. And you’ll practically have Death Valley all to yourself! If you do go in a more heavily trafficked season, go out early in the morning and stay out late. By the time the majority of the tourists get up and get the kids fed, it’s 10:30 or 11 in the morning. Likewise, most of them will head back to the hotel and have dinner and put the kids to bed in the late afternoon/early evening. So if you’re out at sunset, the clouds will start to dissipate and you’ll get some amazing shots. Midday is not good for photography usually—both in terms of the crowds and the lighting.
Understand and break free of the clichés. In our national parks, the views are often prescribed for us: There are specific pullouts that constrain where you can stop, how you can stop, and what you can see. These are the places that have become our iconic imagery. The Snake River Overlook in the Grand Tetons used to be just a minor pullout before Ansel Adams took his picture there. Now if you go there, there’s an interpretive sign with Ansel’s image on it: You’re no longer testing the image against the reality; you’re testing reality against the icon. You’re going to be disappointed you didn’t see the “real thing” you recognize from Ansel’s image, and if you try to duplicate his image, you don’t take away your own experience. Take in these socially prescribed views, then go out and find your own. This comes from understanding the landscape and its intimacy, internalizing that intimacy, then externalizing it in the form of an image. If you don’t feel, you can’t communicate emotion. Without emotion, a photograph is simply a record. Get off the beaten path. One way to find your own view is to get off of the roads where you’re allowed to. In the Smoky Mountains, an astounding percentage of people never get out of the car. In Yellowstone, another significant percentage of people never get more than 200 yards from the road. Just by getting on a trail and walking, even if it’s just a half mile, will give you images most other people aren’t going to get. Experiment with your lenses. The 10-24mm, for example, is going to give you a wider view than most other people shooting at the park are going to be able to get, because they’re not using that kind of a wide lens. Shoot very low with a wide-angle lens to place a lot of foreground in the image; shoot at a high aperture like f/22 to get a lot of depth of field in that foreground. The alternative to that is to use your longest lens to shoot landscape details you can’t get to physically—that will work great at picking up details in the landscape. Most people won’t use their long lenses for that—they think they’re just going to photograph animals with those types of lenses. Change your perspective. The world was not created at your eye height: Get down off of the tripod if you’re using one, bend down, find something to climb up on, so that you’re shooting from a different angle than 90 percent of the population. Go for the details as well as the panoramic shots. The truth is always in the details. While those wide, sweeping vistas are overwhelming and take your breath away, they often don’t communicate the true emotion of the place. An abstract of a thermal pool or a piece of grass in the autumn—those are the things that communicate the intimacy and passion of a park. Add people into your shots. People can be part of the landscape and part of the story you’re telling, whether it’s your own family or other people who are visiting the park. Even if it’s just a shot showing how crowded the park is, that’s still a visual reminder of your experience there. Incorporating people into your shots can also add context and a sense of scale.
 However, there are instances when you need to use a polarizer: In the thermal areas of Yellowstone, for example, you need one to cut the glare off of the water and saturate the colors underneath. And, contrary to what we were taught years ago, a polarizer can have a huge effect and beautifully saturate colors on a cloudy day: Just because the sun isn't out doesn't mean that you don't need the polarizing filter. I’ll often put the filter on and decide whether or not it’s a good idea; I also use my polarized sunglasses to judge how much of an effect a polarizer would make on the final image. I’ll make a judgment in the field as to whether or not I should use a graduated neutral-density filter or whether the end effect I want can be accomplished in post-processing. This comes from experience and knowing your post-processing/Photoshop skills and limitations. I’ll use regular neutral-density filters to slow down the shutter speed so that I can get special effects (e.g., especially blurry water for a dreamy effect). Maximize your time by going for quality, not quantity. I lived at Yellowstone for a while, so I could go in every day for two weeks to capture the height of the blooms or colors; most people, however, are probably only coming for a few days and, understandably, want to shoot everything possible in the park in those few days. That’s an enormous challenge. Prioritize and allocate your time. You have to take a deep breath and know that a few great pictures of a few wonderful places or objects is better than 1,000 mediocre pictures of every location you hit in the park. Quality is much better than quantity. If you have limited time, spend it in limited places. This is where that pretrip research I mentioned early comes in—it’s so important for this prioritization.


For more on Sandra's work, go to www.sandranykerk.com.

The world’s only 15X zoom lens! Tamron’s perfect all-in-one lens features VC, Tamron’s image stabilizer for blur-free shooting without camera shake at up to four stops slower than usual. The lens offers a convenient, comfortable and versatile all-in-one solution that is ultra light (19.4 oz.) and just 3.8” long. It's the ideal zoom lens to pack for your next vacation. Tamron 6-Year USA warranty and $80 mail-in rebate when purchased from Unique Photo.