At Unique Photo we're always looking for reasons to test out products...to help better inform the customer of course :-) Unique University instructor Taryn Truese was gracious enough to make this little write-up about her experiment with just one speedlight and a simple accessory that every photographer should have in their gear bag. Without further adieu here is one photographer's journey through trial and error so you won't have to:
Here is a simple pictorial guide to basic off-camera flash photography with and without the Rogue Flash Bender. This nifty little device creates a big difference with the spread of light in your images. All of these images of Unique Photo Marketing Coordinator Kristina Sanacore, are taken straight out of the camera as jpgs except the final portraits.
Here is the list of equipment that I used. Each piece was chosen due to its affordability and quality.
3. Nissin 866 Mii Speedlight (for Canon)
5. Westcott Flash Mount Bracket
6. Expo Imaging Rogue Flash Bender (Large)
(Also available in a kit that I HIGHLY recommend)
7. (2) Pocket Wizards Plus III Transceivers
9. Savage 53in Paper Background

I purposely kept the background wrinkled so you can see how it catches the light and where the shadows from the wrinkles hit. It’s best to make sure your paper is smooth when you are on a professional shoot.
The angle of the Speedlight remains the same for every sample image. However, I do change the angle at the end for the portrait shots.
SET 1: BARE SPEEDLIGHT FLASH

BARE FLASH: Notice the harsh/defined shadow cast on the background as well as the fact that you can’t see the bottom half of her outfit. I’m starting off at a fast aperture and a moderate ISO to let in a decent amount of light.

BARE FLASH: Her face is a little bit blown out already at 1/64 power but her shoes are lost in darkness.

BARE FLASH: Now the light has completely blown out her face, but hey I’m starting to see her shoes!
 I decided to switch the aperture to F8 instead of F4. Otherwise, you would just see a white blotch instead of a face once I begin to raise the power on the speedlight. At this power you can now raise your Aperture to allow more in focus if needed.
OK, ok, a little bit blown out on the face... but salvageable.
Let’s look at a closeup.

Slightly blown out at 1/16 power.
 GHOST! At ? power she is completely blown out in the face at F8. But you can finally start to see her legs. At this point, I know I can lower my ISO to 100.
  The ISO is now lowered to 100. Her face is no longer blown out, but I personally am despising the falloff and the fact that you can no longer see her legs and feet again. Let’s look at a closeup of her face.
  There’s some specular highlights on her forehead, bridge of her nose and cheek, yet some of the shadows are just so harsh and dark. The portrait is dramatic, but not well toned. It translates well enough as ¾ or full body but not so much for a closeup on her face. Let’s continue...
OK, not bad. Face is slightly blown out again. But if needed, we can work with this.
 At ½ power, even the background is blown out at these settings! It’s BAD, really bad to blow our parts of an image. Once the image is white, there’s no information left to bring back. So try not to blow anything out. Time to make some changes.
I decided to switch my Aperture to F11. Her face is no longer blown out and the background is starting to come back.

FOILED AGAIN! At Full Power (1/1) F11 does not stand a chance!

I switched the Aperture from F11 to F16. This ensured parts of the image would not be blown out, although they are still too light. And the shoes are gone again...
Becoming frustrated with the tonal imbalance of my images, I decided to use the Rogue Flash Bender and see what is created. 
Now to test the same scenarios again with the Flash Bender.

Ok, so this is obviously too dark at these settings, but the fact that I can already see ALL of Kristina makes me happy!
I’m suspecting that because we are throwing light towards the ceiling and then bouncing it onto Kristina with the Flash Bender, we are losing some of the light that a direct bare flash would produce. However the even tone across the image is hopeful. Crossroads: I can stay at this power and either switch my Aperture to something like F2 or up my ISO to maybe 800, but instead I am going to strengthen the power of the speedlight. 
Still too dark, but it’s getting there, I can see it!

Looking better!


There we go! Nice.
At this point, I’ve decided that I want to lower my ISO, which the next image will illustrate.

All of the settings are the same except my ISO is now lowered to 100 instead of 400.
Now to raise the Speedlight power again.


Almost Kristina! Now that it’s looking brighter, I am going to switch my Aperture to F8. Let’s see what happens.

Too dark! Ok, one last option... time to go Full Power!

Nice! Her face looks great and I can see her outfit. Let’s try some portrait shots at these speedlight and camera settings!

Bare Flash Speedlight - No Modifiers

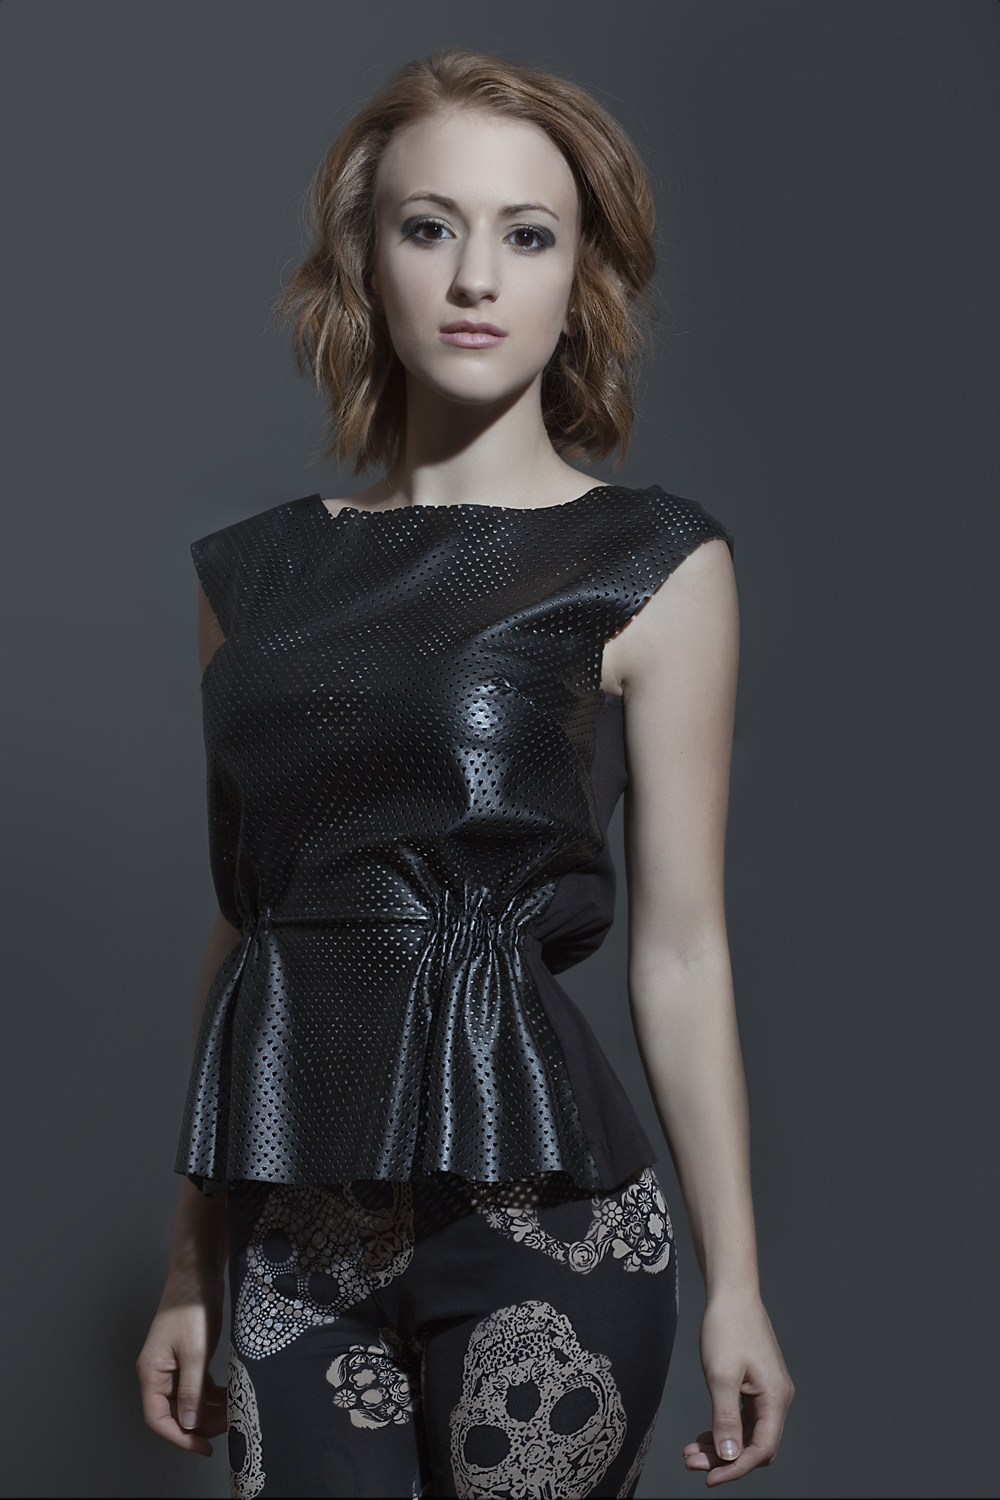
With the Flash Bender
As you can see from Tayrn's struggle with just a bare flash, the FlashBender helped her achieve a more even light for a better full body portrait. Pretty impressive for just one light! I have to admit that the dramatic light and shadow play from the bare light does look good, but if you're trying to sell an outfit there's a good chance you'll want to emphasize on the whole package instead of dramatic lighting. Often you hear the question: What's one accessory that you wouldn't leave behind? Well this just might be that one accessory for the upcoming strobist. Something as simple as a flexible reflector can really help save you a headache when you're stuck with just one flash.