Our ancient ancestors used to think you could climb a tree and pick the stars out of the sky like berries. At one point or another, they may have even interpreted the heavens as a crystalline roof of sorts. Fast forward a long, long time, and here we are today, knowing that climbing a tree to eat a "star berry" isn't exactly possible. What is possible, however, is taking star trail photos: pictures that track the moments of the stars throughout the night over the course of an hour or more.
There are some common misconceptions about the creation of these photos, which I will dispel right now: Star trail photos can be made in areas with light pollution, and you don't need to drain your battery by exposing your sensor for an hour or more at once. In fact, star trail photos have recently become very easy (in process, at least), to create. In essence, you'll be stitching together a series of photos with smaller star trails to create your image. Here's what you'll need:
- A timer remote for timed shutter release. Phottix makes great timers, and we have them for you. -For Nikon D3, D700, D300, etc. -For Nikon D90, D3100, D5000, D7000/7100 -For most Canon DSLRs
- StarstaX, a freeware application available for OSX, Windows, and Linux (more on this below)
- Some sort of tripod. We don't want the camera to move! (we here at Unique have you covered: click here for our selection)
- A preferably cloudless or partially cloudy night. Aim for an evening with lower humidity if possible, to prevent dew buildup on the camera.
 Radio Tower at Night (Copyright Trevor Williams)
The process is very easy:
- Set a manual white balance (~2500 or ~10,000, if you want a 'cool' or 'warm' sky respectively).
- Set the shutter speed with the Phottix (or similar) timer to 30-60 seconds.
- Set a wide aperture and shoot around ISO640-1000.
- Focus to just before infinity on your lens (this is usually where stars are in focus). Remember to leave the camera on manual focus!
- Take a test shot. What you should see, first of all, is that the stars in your photo will have moved slightly due to the exposure time. This is exactly what you want to see. You may also notice that you can see more stars in the shot than you can see with your eye; that's because you're shooting at a higher ISO and wider aperture than you would for a half-hour or longer exposure. Tweak a few settings as necessary, such as focus, shutter speed, aperture, and white balance to suit your taste. The sky needn't be completely black; if you're near a major city like we are here at Unique Photo, you'll most likely see a color hue in the sky. This will be fine.
- When you're satisfied with your settings, set the remote timer to take enough shots to cover an hour or more's worth of photos. Leave the interval between shots at 0, otherwise you'll have gaps in the star trails that create an unwanted "dotted line" effect rather than a smooth trail. Alternatively, you can use the remote timer to "lock" your shutter while the camera is in "Continuous" photo mode for seamless photos.
- Let the camera and timer snap away at the sky until they're finished.
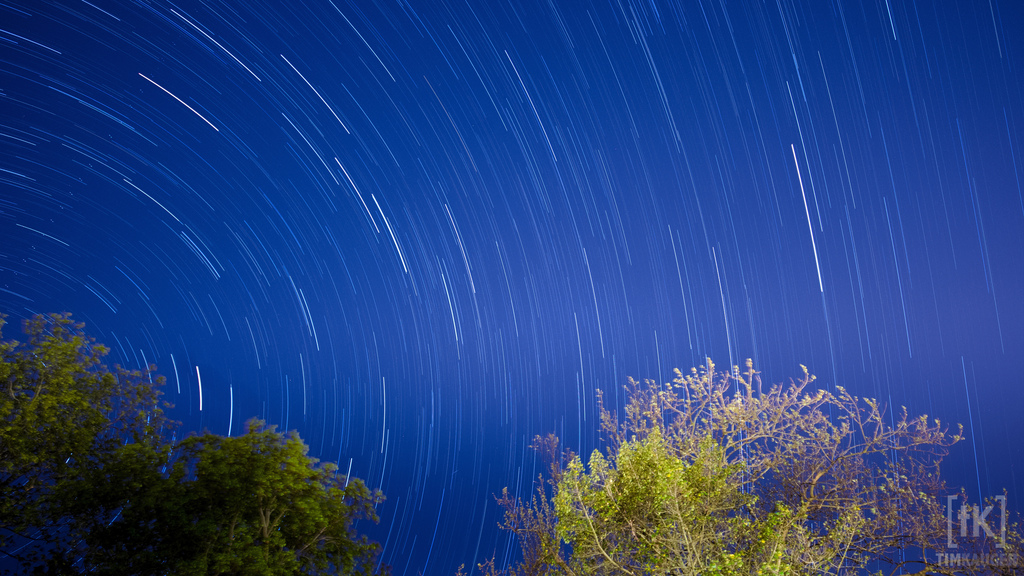
 Star trails will be longer the farther they are from the North Star (copyright Trevor Williams)
Here's where the clever StarstaX software comes into its own. Once you've uploaded the pictures to your computer, open StarstaX, drag the images into the specified window, and select "Edit > Start". Before your eyes, the program will stitch all of these photos together, to create one cohesive star trail image. If there's any foreground in your image, such as trees or a building, the program won't edit it provided the tripod kept the camera still. There are various blending modes with which the program can create your image; if you don't like the result of one, simply try again. It's that easy. By using a higher ISO and a wider aperture for each shot than you would for a single hour-long exposure, your final image will have far more celestial objects than you can see at the time. The image at the top of this post was taken about twenty miles away from New York City and ten miles away from Morristown, NJ. If I had to guess, I saw only about half of the stars in the photo with my own eyes -- imagine your results in the middle of New Mexico on a moonless night!
Update: If you have Adobe Lightroom, importing all of the photos and doing some noise reduction/color correction will make your final image even better. To do so quickly, make the changes you want to a single image, select all of the photos in the catalog, and press the "sync" button that appears to apply the changes to all of the images.
If you decide to try this out for yourself, post your results to the Unique Photo Flickr pool or the Unique Photo Facebook page.
-- Hat Tip to Trevor Williams, aka Tdub Photo, for letting us use some of his awesome images. Visit his website and his Facebook page to see more of his work.
Tim Kauger is a blogger and photographer based in Short Hills, NJ. You can visit his website here.