Shooting handheld in low light is a balancing act—keeping shutter speeds fast enough to avoid blur while squeezing every drop of sensitivity and stabilization from your camera and lens. As a trusted resource for creators, Unique Photo offers practical education and the gear to help you nail sharp, clean images without a tripod. Below is a complete, SEO-friendly guide to the best handheld low-light settings, techniques, and useful accessories.
Why handheld low light is hard—and how to beat it
In dim scenes, your camera needs more time or more sensitivity to gather light. Without a tripod, long exposures introduce blur from hand shake or subject movement. The solution is a smart mix of shutter speed, aperture, ISO, stabilization, and technique—plus a few creative choices when you can’t change the light.
Best handheld low-light camera settings (quick-start cheat sheet)
- Mode: Aperture Priority (A/Av) or Manual with Auto ISO
- Shutter speed floor: 1/(focal length × crop factor) as a starting point; lower if your IBIS/OIS is strong
- Aperture: Wide open (f/1.2–f/2.8) to maximize light
- ISO: Auto ISO with a defined ceiling; set 6400–12,800 for modern full-frame, 3200–6400 for APS-C/MFT
- Metering: Evaluative/Matrix; use exposure compensation to protect highlights
- AF: Single-point for static subjects; continuous AF with eye/face detect for people in motion
- Drive: Short bursts (3–5 frames) to increase odds of a sharp keeper
- File format: RAW for maximum latitude in noise reduction and color correction
Scenario baselines (tune per camera/lens):
- Indoor events (people): 1/125–1/250 sec, f/1.8, ISO 3200–6400
- Street at night (static): 1/60–1/125 sec, f/1.4–f/2, ISO 6400–12,800
- Museum/low-lit interiors: 1/30–1/60 sec (with IBIS), f/2–f/2.8, ISO 3200–6400
Shutter speed: how slow can you go without a tripod?
Start with the reciprocal rule: 1 divided by your focal length (adjusted for crop). With stabilization, many can handhold 2–4 stops slower. For example, a 35mm lens on full-frame:
- No stabilization: ~1/40 sec
- With strong IBIS/OIS: 1/10 sec or even 1/5 sec (for static subjects)
Subject movement matters: people in motion often need 1/125–1/250 sec to avoid motion blur. When possible, time your shot at natural pauses (after a step, at a breath).
Aperture: open wide, but watch depth of field
Fast primes (f/1.2–f/2) are low-light heroes. Open up to gather light but be mindful of razor-thin depth of field. If your subject isn’t flat to the lens (e.g., groups), stop down slightly (f/2–f/2.8) and compensate with ISO. Lens profiles and modern cameras handle wide-open performance remarkably well; check focus carefully and use eye-detect when available.
ISO: set smart ceilings for clean results
Enable Auto ISO and set a reasonable max. Many current full-frame sensors remain very usable at ISO 12,800, APS-C at 6400, and MFT at 3200–6400. Slightly bias exposure to the right without clipping highlights; underexposure raised in post often looks noisier than a properly exposed high ISO frame.
Autofocus and manual focus tips for dim scenes
- Use single-point AF on high-contrast edges for static subjects; use AF-C for moving subjects.
- Turn on eye/face detect for portraits; if it hunts, switch to a small point over the eye.
- If AF struggles, use manual focus with magnification and focus peaking.
- Add a small amount of backlight or edge light to increase contrast if possible.
Stabilization: IBIS, OIS and better handheld technique
- Enable in-body/lens stabilization; match focal length settings if using manual lenses.
- Brace elbows into your torso, control breathing, and roll the shutter between breaths.
- Use your camera strap as tension support: pull it taut around your neck for extra stability.
- Shoot short bursts; the middle frame is often sharpest.
- Lean on walls, door frames, or stable surfaces to add extra stops of steadiness.
Creative choices that embrace low light
When the light is dim and you can’t raise it, lean into the mood:
- Intentional motion: pan with moving subjects at 1/15–1/30 sec for sharp subjects with blurred backgrounds.
- Glow and atmosphere: diffusion filters like the Tiffen Soft Glow series can add cinematic halation around highlights, letting you prioritize tone and mood over absolute sharpness. Unique Photo carries options such as the Tiffen 82mm Soft Glow 4 Filter (SKU: TFL299) and the Tiffen 77mm Golden Glow 2 Filter (SKU: TFL353) for a warm, nostalgic look under streetlights.
Add a little light—no tripod required
Portable LEDs can be handheld or mounted off-camera to lower ISO, speed up shutter, and clean up noise—all without a tripod. Unique Photo stocks compact solutions:
- Godox ML60II Bi-Color LED Monolight Kit 2 (SKU: GODL1411): A lightweight, bi-color unit with a handle and softbox for controlled, flattering fill you can hold or boom.
- Godox Litemons LA300R RGB LED 3-Light Kit (SKU: GODL1232): Colorful, punchy accents to separate subjects from dark backgrounds and help autofocus lock in.
Even a subtle handheld rim light can improve AF and reduce the ISO you need by one to two stops.
Video in low light, handheld
- Frame rate/shutter: 24p or 30p with 1/50–1/60 sec (180°) keeps motion natural; raise ISO or add light if needed.
- Stabilization: Combine IBIS with lens OIS if your system supports coordinated IS; use digital IS sparingly to avoid extra crop.
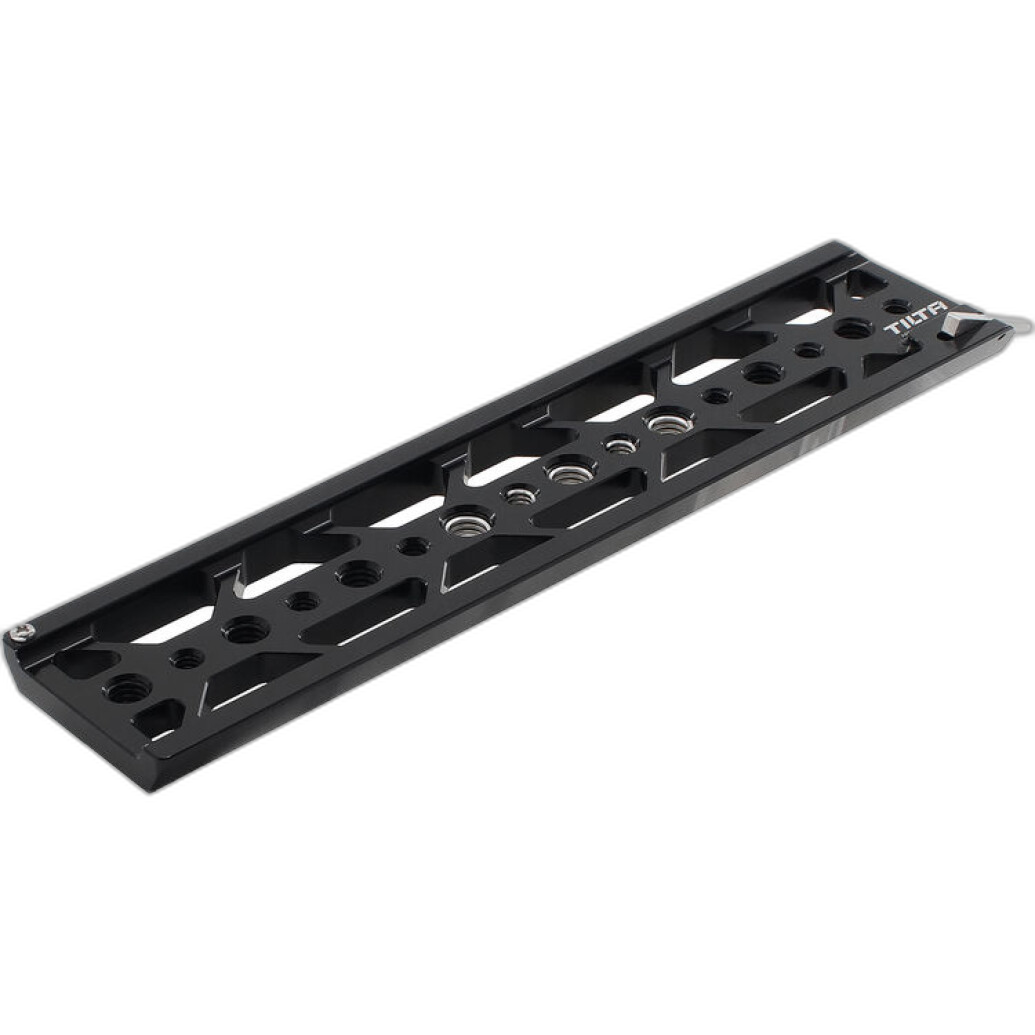
- Rigging for steadiness: Extra mass damps micro-jitters. A simple rig plate can help balance your setup. Tilta’s Lightweight Dovetail Plate (SKU: TIL3061) is a solid building block for handheld rigs.
Noise reduction and workflow tips
- Shoot RAW and keep in-camera high ISO NR modest to preserve detail; handle noise in post with Lightroom, DxO, or dedicated tools.
- Use lens profiles and color calibration to clean up mixed lighting common at night.
- Fast ingest keeps you editing sooner: a dedicated reader like the Lexar Professional Workflow Dual-Slot SD UHS-II Reader (SKU: LRD1116) speeds transfers and supports dual cards.
Practice and learn with Unique Photo
Hands-on learning accelerates your low-light skills. Unique Photo regularly hosts workshops and classes that tackle lighting, exposure, and creative technique:
Sharpen your understanding of how to shape and add light when you need it—skills that translate directly to cleaner low-light handheld images.
Whether you’re embracing available light or supplementing with compact LEDs, the right technique plus a bit of know-how delivers consistent results.
FAQ: quick answers for handheld low light
- What’s the single most important setting? Shutter speed: set a minimum that freezes your subject, then balance aperture and ISO.
- Is Auto ISO okay? Yes—define a max ISO and minimum shutter to keep results predictable.
- Prime or zoom? Fast primes (f/1.2–f/2) give you more light and often better AF in the dark.
- Should I use flash? If allowed, a gentle bounce or small off-camera LED can massively improve image quality without a tripod.
Next steps: dial your settings and build confidence
Start with a fast prime, set a sensible shutter floor, enable Auto ISO with a realistic cap, and practice steady technique. When the scene allows, add a compact LED for a cleaner file. Unique Photo is here with the classes and gear to help you master handheld low light.
Internal linking suggestions for further reading and gear exploration on uniquephoto.com:
- Explore fast prime lenses for low light: lenses category with f/1.2–f/2 options
- Shop continuous LED lighting (Godox, Nanlite): lighting & studio > continuous lighting
- Learn with upcoming classes and workshops: education & events
- Filters for creative low-light looks (Tiffen Soft Glow/Golden Glow)
- Rigs & accessories for steadier handheld video (Tilta)
- Memory & readers for a faster workflow (Lexar)