
Sharpness starts long before you press the shutter. While better lenses and newer camera bodies can help, technique is the true multiplier. At Unique Photo, we see it every day: photographers who master stability, focus, and exposure settings consistently produce crisper images—no matter what they shoot or what they shoot with. Here’s how to prioritize technique versus equipment and know when a gear upgrade really matters.

Why photos look soft: Identifying the cause
Before you fix sharpness, identify what kind of softness you’re seeing:
- Focus blur: The focus point misses the subject, or depth of field is too shallow.
- Motion blur: The subject moves faster than your shutter, or camera shake creeps in.
- Diffraction: Stopping down too far (e.g., f/16–f/22 on many sensors) softens detail globally.
- Lens limits: Field curvature, spherical aberrations, and edge softness vary by lens and aperture.
- Atmosphere and filters: Heat shimmer, haze, or a low-quality/dirty filter reduces micro-contrast.
Technique first: Stability and camera handling
Stability is the foundation of sharp images.
- Shutter speed rule of thumb: Start at 1/(focal length × crop factor). For today’s high-resolution sensors, add a safety factor (e.g., 1.5–2× faster). For a 200mm on full frame, aim for 1/400–1/800s handheld.
- Use IBIS/OIS wisely: Stabilization helps with camera shake, not subject motion. Turn it off on a locked-down tripod unless your camera/lens auto-detects tripod use.
- Tripod technique: Use a sturdy support, remote release or 2–5s self-timer, and electronic first curtain shutter (EFCS) or full electronic shutter when appropriate.
- Body mechanics: Brace elbows, exhale gently at shutter press, use a stable stance, and lean on walls/trees when possible.
- Protect and organize gear: Keep lenses and bodies clean and scratch-free. Products like THREE LEGGED THING 3 Legged Thing Wrapz Swirls Equipment Wrap 3-Pack (12/15/18 in, SKU TLR3097) and the Busseat Medium Equipment Wrap 15 x 15 in (SKU TLR4121) help you transport gear safely so front elements and filters remain pristine for optimal sharpness.
Focusing tactics that nail critical sharpness
- Pick the right AF mode: Use single-point AF for static subjects; continuous/tracking for movement. Don’t rely on wide-area AF for shallow-DOF scenes.
- Move the AF point rather than focus-and-recompose when shooting at wide apertures close to your subject.
- Eye AF is excellent, but confirm which eye it locks on; for groups or off-axis compositions, choose a point manually.
- Manual focus aids: Use magnification and focus peaking, especially for macro, landscape hyperfocal work, and low light.
- Calibrate: If your DSLR or some mirrorless systems support AF microadjustment, dial it in for each lens. Keep a field note of settings—label your lens cap with a fine marker like the Sharpie Permanent Fine Tip Marker (Red) 32722 for quick recall.
Want to master razor-thin depth of field? Join Unique University for NJCS: Macro Tips, Tricks, and Techniques with Mike Moats (Tamron) to learn practical focusing and stability techniques specific to macro.
Exposure settings for maximum crispness
- Shutter speed: Freeze motion with faster shutters than you think—e.g., 1/1000s for sports and birds, 1/250–1/500s for portraits with mild movement.
- Aperture sweet spot: Many lenses peak around f/4–f/8. Avoid stopping down past diffraction limits unless added depth of field is worth the tradeoff.
- ISO and noise: Raising ISO to get a sharper shutter is often better than risking blur. Expose to protect highlights, then apply measured noise reduction before sharpening in post.
When gear really matters for sharpness
- Lenses first: A quality lens often improves sharpness and contrast more than a body upgrade. Primes typically beat zooms at the same focal length.
- Teleconverters: Expect some resolution loss; stop down 1–2 stops and keep shutter speed high.
- Filters: Use multi-coated protective or polarizing filters from reputable brands. Remove cheap, uncoated filters that reduce micro-contrast and introduce flare.
- Service and alignment: If a lens consistently misfocuses or shows decentering, a pro service can restore edge-to-edge sharpness.
Advanced capture tactics
- Short-burst method: Fire 3–5 frames in a quick burst; slight hand movement between frames increases the odds of a critically sharp keeper.
- Pixel-shift/multi-shot modes: Use only for static subjects on a sturdy tripod; any movement can create artifacts.
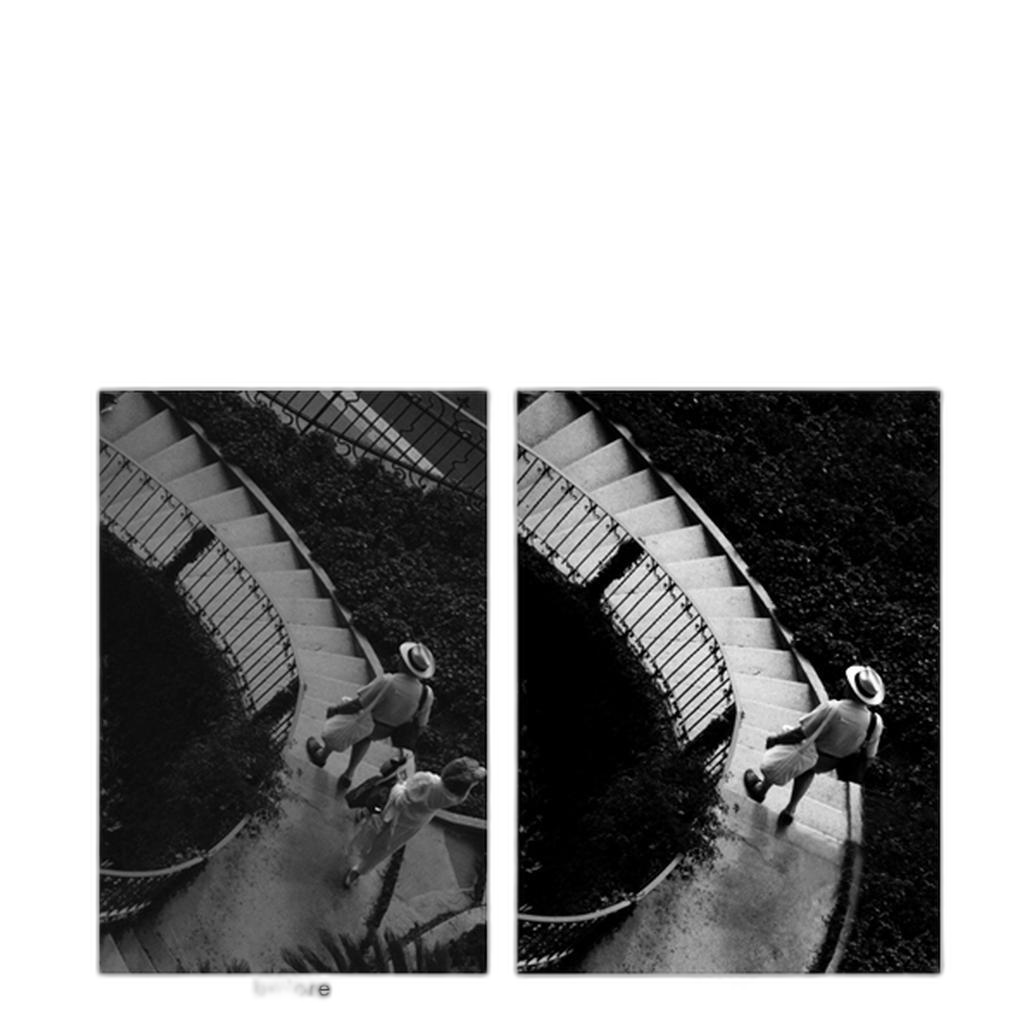
- High-resolution sensors: They reveal technique flaws. Increase shutter speed, refine handholding, and consider a tripod more often.
Smart post-processing: Sharpening that looks natural
- Sharpen in stages: Apply capture sharpening (detail recovery), creative sharpening (local/subject emphasis), and output sharpening (tailored for print or web).
- Order of operations: Remove noise before aggressive sharpening, or you’ll enhance grain instead of detail.
- Masking and radius: Use edge masking to avoid sharpening bokeh and smooth areas; adjust radius to match subject detail size.
Printing is the ultimate sharpness test. Unique Photo’s lab can turn those crisp files into keepsakes. For gifts, try the 3 x 4 Two-Sided Metal Ornament – Two Images (SKU DPMM16187); the hard metal surface and dye-sublimation process deliver punchy, sharp results.

Present your best work with clean, sharp edges using the 16 x 20 Precut Custom Mat for 4/UP images – Assorted Colors (SKU DPM16204UP). Proper presentation emphasizes perceived sharpness and detail.
Genre-by-genre quick checklists
Landscape
- Tripod, EFCS/e-shutter, 2–5s timer or remote
- Base ISO, sweet-spot aperture (f/5.6–f/8), focus at or slightly beyond hyperfocal
- Bracket focus or focus stack when depth of field is insufficient
Portrait
- Use Eye AF or single-point on the nearest eye
- Shutter 1/250–1/500s to freeze subtle movement; add light if needed
- Avoid over-stopping; aim f/2–f/4 for single subjects, f/4–f/5.6 for couples/groups
Sports/Wildlife
- AF-C with subject-tracking; shutter 1/1000–1/3200s
- Short bursts to improve keeper rate
- Turn off stabilization at very high shutter speeds if it introduces lag
Macro
- Tripod or macro rail; use focus peaking/magnification
- Stop down for depth (balance against diffraction); consider stacking
- Control vibration; even mirror slap can soften extreme macro
Get expert feedback and keep learning with Unique Photo
Feedback accelerates sharpness. Book a Portfolio Consultation & Images Reviewed by Judith Farber—available in 30-minute (SKU UUU263) and 120-minute (SKU UUU266) sessions—to audit technique and settings and get personalized action items.

Technique vs. equipment: A balanced path to sharper photos
Start with technique—stability, deliberate focusing, and exposure choices—because it costs nothing and works with any camera. Then invest in gear where it moves the needle most: sharp lenses, stable supports, and dependable accessories. Keep your kit protected with THREE LEGGED THING Wrapz, organize your notes with a fine-tip marker, and refine your craft through Unique University and portfolio reviews.
Internal linking suggestions:
- Unique University classes: NJCS: Macro Tips, Tricks, and Techniques with Mike Moats (Tamron)
- Photo lab and gifts: 3 x 4 Two-Sided Metal Ornament – Two Images
- Presentation: 16 x 20 Precut Custom Mat for 4/UP images – Assorted Colors
- Accessories and protection: 3 Legged Thing Wrapz Swirls Equipment Wrap 3-Pack; 3 Legged Thing Wrapz Busseat Medium Equipment Wrap
- Consultations: Portfolio Consultation & Images Reviewed by Judith Farber (30 min and 120 min)
- Tripods & supports, lenses, and filters categories at Unique Photo