
By Jennifer Gidman | Images by Judith Pishnery
 Most photographers are gadget geeks (in a good way) and tend to take everything they own with them. If you’re driving and can leave some of your gear in the car, that’s OK, but if you’re walking and taking public transportation around a busy city, having all of your gear with you all of the time can be tedious—it gets heavy real fast. Take along a small backpack (something that’s lightweight, doesn’t shout out “photographer,” and has a slot for a bottle of water), a lightweight or compact tripod, plenty of media cards/storage, a shutter release (remote release or cable release), and a polarizing filter. I rarely take a flash—since my camera doesn’t have one built in, I would need a Speedlight, which is just too bulky). You’ll want to bring your favorite two or three lenses, including a wide angle and a reasonable telephoto. I like the Tamron 28-300mm VC lens—it’s perfect for travel and offers a little wide angle to a decent telephoto range. I also like the Tamron 70-200mm f/2.8 lens: It’s a supersharp lens that’s amazing in low light because of that f/2.8 aperture. When I actually hit the streets, I usually choose one lens and make it work for me all day, even if I packed more than one. This way, I’m taking more photos, really getting used to that specific lens, and not constantly changing lenses. Each day I try to choose a different lens to get different perspectives and change up what my photos look like. Do your research and get recommendations before heading out.
  I pick up guidebooks on the city I’m heading to to check out the city maps and to look for historic sites. I’ll do an Internet search for places of interest and ask friends and acquaintances for recommendations. When I get to my destination, I’ll sometimes take a guided tour, which really helps orient me to a new place. Ask employees of the hotel you’re staying at or the tour guide for their favorite places—not just the touristy places, but sites where the locals go. Be open to all forms of transportation. I really like walking around a city. It makes you slow down and really check out your surroundings. I’m also very comfortable renting a car and just driving around the countryside in the U.S. and in most European countries: You can easily stop anywhere you want to photograph. I’ve never done a double-decker bus tour in a city, but I think it would be amazing just for the elevated viewpoint. Shoot a variety of images.
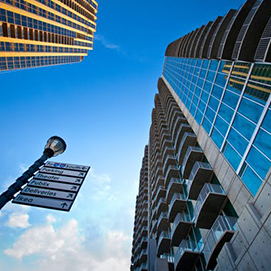
The architecture of a city sets the style, from the smallest details to skyscrapers to a full city block or cityscape. If you only shoot one type of image (e.g., only full building shots), you’re missing the bigger picture of that city. I sometimes get stuck on one style or type of photo and have to force myself to look at a variety of subjects and viewpoints. Concentrate on varying angles and creative framing for different perspectives. I don’t always shoot from eye level, which can become a boring, redundant viewpoint. Sit on the ground, stand on a bench, photograph from your hotel window—I have lots of these shots (you can often get amazing views from your hotel). Check out parking decks, if your hotel has any: Go to the top and check out the view from there. Find other buildings open to the public that might have panoramic views of the city.  Think carefully about your compositions—don’t center everything in your frame. If the sky is great that day, maybe include lots of the sky in your image. If the sky is overcast and gray, however, focus on your subject’s details and minimize how much sky is in the frame. Shooting skyscrapers in big cities can be challenging, but make it creative: Use a wide-angle lens and work with the distortion to create something fun. Try framing the building with other elements in the foreground (e.g., doorways, trees, people, flagpoles, cars) to add depth and scale.
  Put famous landmarks in a new context. Pick up some postcards from a local postcard stand to get an idea of how that city’s famous landmarks and places are already shown—then aim to shoot those same landmarks and places from a different perspective, as explain ed previously: Do a close-up shot with a wide-angle lens, shoot the landmark from further away than it’s usually shot, incorporate some of the city’s background into the shot, lay on the ground, shoot only the details—make it your own unique photo that you won’t find in any other portfolio of that landmark. Time some of your shots to include the hustle and bustle… Taking advantage of midday events and busy places adds a great vibe to your photos. Try to find interesting ways to capture that hustle and bustle—that’s part of the city’s personality. The people on those city streets add emotion to your photos. Shoot the people you meet—but be polite. If they don’t want their photograph taken, respect that and shoot something else. …and other shots to simply capture the empty city streets. Going to popular locations in the off-season will minimize the number of people in your shots (if that’s what you’re looking for). Head out early while the rest of the city is still sleeping, and stick around at popular sites after the tour buses have left. If it’s a rainy day and everyone is holed up inside, put on your poncho, cover your camera with a shower cap or Ziploc bag, and take a walk in the rain. This can lead to some beautiful, people-free city scenes.
 Think carefully about your compositions—don’t center everything in your frame. If the sky is great that day, maybe include lots of the sky in your image. If the sky is overcast and gray, however, focus on your subject’s details and minimize how much sky is in the frame. Shooting skyscrapers in big cities can be challenging, but make it creative: Use a wide-angle lens and work with the distortion to create something fun. Try framing the building with other elements in the foreground (e.g., doorways, trees, people, flagpoles, cars) to add depth and scale.
  Put famous landmarks in a new context. Pick up some postcards from a local postcard stand to get an idea of how that city’s famous landmarks and places are already shown—then aim to shoot those same landmarks and places from a different perspective, as explain ed previously: Do a close-up shot with a wide-angle lens, shoot the landmark from further away than it’s usually shot, incorporate some of the city’s background into the shot, lay on the ground, shoot only the details—make it your own unique photo that you won’t find in any other portfolio of that landmark. Time some of your shots to include the hustle and bustle… Taking advantage of midday events and busy places adds a great vibe to your photos. Try to find interesting ways to capture that hustle and bustle—that’s part of the city’s personality. The people on those city streets add emotion to your photos. Shoot the people you meet—but be polite. If they don’t want their photograph taken, respect that and shoot something else. …and other shots to simply capture the empty city streets. Going to popular locations in the off-season will minimize the number of people in your shots (if that’s what you’re looking for). Head out early while the rest of the city is still sleeping, and stick around at popular sites after the tour buses have left. If it’s a rainy day and everyone is holed up inside, put on your poncho, cover your camera with a shower cap or Ziploc bag, and take a walk in the rain. This can lead to some beautiful, people-free city scenes.
Look for the light—and supplement with flash if needed. If many of your shots are going to be people shots, pack a flash. (Learning how to use it before you travel is key to coming back with good shots.) For other types of shots, however, I rarely travel with a flash—I have enough equipment to keep up with! With the ability to achieve high ISOs yet low noise on most new cameras, I just look for good light; keep a sturdy, lightweight tripod handy (a good option if your shutter speeds are at 60 or below and you want to avoid the blur from camera shake); and bracket my exposures when needed. I’ve started to use some HDR effects in my landscapes and building shots to make up for not having a flash in those situations (HDR isn’t a good solution for people photos, though).  Make sure you get a city skyline shot—especially at night. Look for vantage points that offer vista views of a city for that requisite skyline shot. I like early morning, before sunrise and just after sunrise, and late afternoon. My favorite time, however, is just after sunset, when I can capture the rich blue sky and the building lights are just beginning to make the city sparkle. To shoot the before-sunrise, after-sunset and night shots, you’ll need a sturdy tripod, a shutter release (or your self-timer setting), and a little patience. Set the ISO to 100 or 200 and your f-stop to around 11 or higher. (This is why you’ll need that tripod—your shutter speed for these shots when you’re using an ISO of 100 or 200 is going to be approximately 1 second or longer.) Next, set the exposure: I normally shoot at the normal exposure and then bracket +1, +2, –1, and –2. This can be done in any of the exposure settings on your camera (manual, A/aperture priority, S or TV/shutter priority and Program—but not full auto).
 Make sure you get a city skyline shot—especially at night. Look for vantage points that offer vista views of a city for that requisite skyline shot. I like early morning, before sunrise and just after sunrise, and late afternoon. My favorite time, however, is just after sunset, when I can capture the rich blue sky and the building lights are just beginning to make the city sparkle. To shoot the before-sunrise, after-sunset and night shots, you’ll need a sturdy tripod, a shutter release (or your self-timer setting), and a little patience. Set the ISO to 100 or 200 and your f-stop to around 11 or higher. (This is why you’ll need that tripod—your shutter speed for these shots when you’re using an ISO of 100 or 200 is going to be approximately 1 second or longer.) Next, set the exposure: I normally shoot at the normal exposure and then bracket +1, +2, –1, and –2. This can be done in any of the exposure settings on your camera (manual, A/aperture priority, S or TV/shutter priority and Program—but not full auto).
Experiment, be spontaneous, and keep shooting.
Relax, enjoy, and shoot a lot. Always have your camera ready: If your camera is in the bag or turned off, you’ll miss some great, spontaneous moments. Experiment and photograph the “what if” moments: What if I shoot this? Just try it—it could be amazing! I once had a participant in one of my workshops who only wanted to shoot the shots that “sell”; he missed so many unique opportunities to do something different from the postcards pics that are already available. Some of my more “experimental” images are the ones that I like and other people really do want to buy, so don’t be afraid to try something different.

The world’s only 15X zoom lens! Tamron’s perfect all-in-one lens features VC, Tamron’s image stabilizer for blur-free shooting without camera shake at up to four stops slower than usual. The lens offers a convenient, comfortable and versatile all-in-one solution that is ultra light (19.4 oz.) and just 3.8” long. It's the ideal zoom lens to pack for your next vacation. Tamron 6-Year USA warranty and $80 mail-in rebate when purchased from Unique Photo.